http://arstechnica.com/business/news/2009/12/-the-usb-flash-drive.ars
WinToFlash
http://www.panticz.de/MultiBootUSB
http://www.webupd8.org/2009/04/4-ways-to-create-bootable-live-usb.html
1. Using UNetbootin (for Windows and Linux)
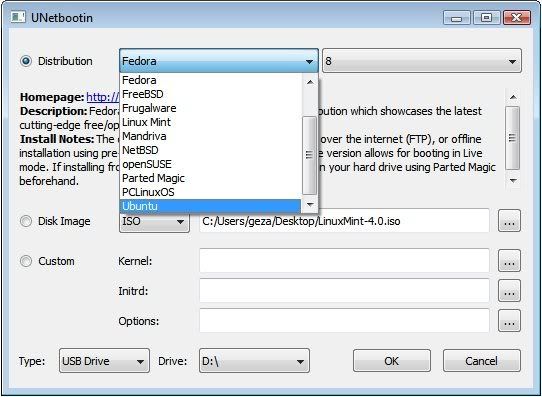 UNetbootin allows you to create bootable Live USB drives for a variety of Linux distributions from Windows or Linux, without requiring you to burn a CD. You can either let it download one of the many distributions supported out-of-the-box for you, or supply your own Linux .iso file if you've already downloaded one or your preferred distribution isn't on the list.
UNetbootin has built-in support for automatically downloading and loading the following distributions: Ubuntu, Debian, Fedora, PCLinuxOS, Linux Mint, Sabayon Linux, Gentoo, MEPIS, openSUSE, Zenwalk, Slax, Dreamlinux, Arch Linux, Elive, CentOS, Damn Small Linux, Mandriva, SliTaz, FaunOS, Puppy Linux, FreeBSD, gNewSense, Frugalware Linux, NetBSD but can work with others too.
UNetbootin can also be used to load various system utilities, including:
- Parted Magic, a partition manager that can resize, repair, backup, and restore partitions.
- Super Grub Disk, a boot utility that can restore and repair overwritten and misconfigured GRUB installs or directly boot various operating systems
- Backtrack, a utility used for network analysis and penetration testing.
- Ophcrack, a utility which can recover Windows passwords.
- NTPasswd, a utility which can reset Windows passwords and edit the registry.
- Gujin, a graphical bootloader that can also be used to boot various operating systems and media.
- Smart Boot Manager (SBM), which can boot off CD-ROM and floppy drives on computers with a faulty BIOS.
- FreeDOS, which can run BIOS flash and other legacy DOS utilities.
Installation & Screenshots
- If using Windows, run the file, select a distribution, floppy/hard disk image, or kernel/initrd to load, select a target drive (USB Drive or Hard Disk), then reboot once done.
- If using Linux, make the file executable (using either the command
chmod +x ./unetbootin-linux, or going to Properties->Permissions and checking "Execute"), then start the application, you will be prompted for your password to grant the application administrative rights, then the main dialog will appear, where you select a distribution and install target (USB Drive or Hard Disk), then reboot when prompted. - After rebooting, if you created a Live USB drive by selecting "USB Drive" as your install target, press the appropriate button (usually F1, F2, F12, ESC, or backspace) while your computer is starting up to get to your BIOS boot menu and select USB drive as the startup target; otherwise if there's no boot selection option, go to the BIOS setup menu and change the startup order to boot USB by default. Otherwise, if you did a "frugal install" by selecting "Hard Disk" as your install target, select the UNetbootin entry from the Windows Boot Menu as the system boots up.
To create a Live USB using UNetbootin, download an ISO file, select it under UNetbootin's "diskimage" option, and specify your target USB disk under "Drive:". After pressing OK, wait as the ISO is extracted to your USB drive; once done, you will have a bootable Linux Mint Live USB drive.
Requirements
1 GB or larger USB drive, formatted as Fat32 (most USB drives come formatted as FAT32 by default, but if you need to format it, on Windows, go to My Computer->right click your USB drive->format, or on Linux, use GParted or another partition manager)
Supported operating systems: Windows 2000 and above OR a modern Linux distribution
Additional dependencies (Linux Only): You will need the packages syslinux and p7zip-fullinstalled (no dependencies on Windows)


Update: Ubuntu now includes "Startup disk creator". You can access it via System > Administration > Startup Disk Creator and it's a very easy to use tool. Simply enter your memory stick into the USB drive, then open Startup Disk Creator and select "Format" (the USB stick needs to be formatted first), then select the ISO image you want to write on the USB memory stick and click "Make startup disk". That's it.
Supported operating systems: Windows 2000 and above OR a modern Linux distribution
Additional dependencies (Linux Only): You will need the packages syslinux and p7zip-fullinstalled (no dependencies on Windows)
2. Using Win32 Image Writer (Windows only)
Graphical Interface
- Download the desired .img file
- Download Disk Imager from https://launchpad.net/win32-image-writer/+download
- Insert your flash media
- Note the drive letter assigned to your flash media
- Start Disk Imager
- Select the downloaded file and target device, and click "Write"
- Remove your flash media when the operation is complete
Command Line alternative
- Download the desired .img file
- Download flashnul from http://shounen.ru/soft/flashnul
- Attach your USB drive
- Run flashnul -p
- Note the physical device number for the USB drive
- Run flashnul
-L \path\to\downloaded.img - Answer "yes" if the selected destination device is correct
- Remove your USB drive when the command completes
3. Using usb-imagewriter (Ubuntu Only)
Graphical Interface
- Download the desired .img file
- Install the usb-imagewriter package
- If your release does not include this, download it from Oliver's PPA
- Open Applications -> Accessories -> Image Writer
- Insert your flash media
- Select the downloaded file and flash device, and click "Write to Device"
- Remove your device when the operation is complete
Command Line alternative
- Download the desired .img file
- Open a terminal and insert your flash media
- Look at the output of dmesg | tail -20 to determine the device node assigned to your flash media (e.g. /dev/sdb)
- Run sudo umount /dev/device/node
- Run sudo dd if=/path/to/downloaded.img of=/dev/device/node bs=1M
- Remove your flash media when the command completes
Update: Ubuntu now includes "Startup disk creator". You can access it via System > Administration > Startup Disk Creator and it's a very easy to use tool. Simply enter your memory stick into the USB drive, then open Startup Disk Creator and select "Format" (the USB stick needs to be formatted first), then select the ISO image you want to write on the USB memory stick and click "Make startup disk". That's it.
4. Using Diskutil (Mac OS X only)
- Download the desired .img file
- Open a Terminal (under Utilities)
- Run diskutil list to get the current list of devices
- Insert your flash media
- Run diskutil list again and determine the device node assigned to your flash media (e.g. /dev/disk2)
- Run diskutil unmountDisk /dev/diskN
- Execute sudo dd if=/path/to/downloaded.img of=/dev/diskN bs=1m
- Run diskutil eject /dev/diskN and remove your flash media when the command completes
Boot From A USB Flash Drive
For starters this is still a new science and many people have had good luck with at least one of these methods and others have not. Note that flash drives are often also called thumb drives, keychain drives, pendrives, etc. The NEWEST methods are listed last on this page, starting with Method 7 for Vista/Win7A FEW THINGS YOU NEED TO CONSIDER IN ADVANCE.1. The PC has to support booting from a USB flash/pen/key drive. There may be anywhere from 1-3 items to change in the BIOS to make this possible assuming your BIOS supports it. Some bios's may refer to your flash drive as a USB floppy or USB zip. Of course there are exceptions, perhaps some are covered here.
2. The USB flash drive must support booting from it in general.
3. The flash drive must contain the boot/system files.
4. The flash drive must have bootsector area. This is done with special utilities.
5. References to "A:" drive lines in the autoexec.bat and/or config.sys files you copy to the drive after you make it bootable may result in errors.
6. You "may" have to format your floppy disk first in WinXP before you create a bootdisk as XP may "not" like working later on with a disk formatted otherwise.
7. Included below is a bootable ISO of DOS 7.1 which may be used with some of these methods if you do not have a 1.44 drive.
METHODSMethod 1 - Make your flash drive bootable using Bart's mkbt util:
http://www.nu2.nu/mkbt/ | Alt: mkbt20.zipPut a bootable floppy disk in your A: drive or create one using Windows.
Download mkbt20.zip and unpack to to new temp folder you create.
Go to the temp folder.
Extract the bootsector from the bootable floppy disk. eg Open a DOS Window and go to the directory where you extracted MKBT. Type:mkbt -c a: bootsect.binThe boot sectors from the bootable floppy disk have just been saved to a file in the temp folder you created.Format the flash drive in FAT or FAT16.Copy the bootsector to the flash drive. Open a DOS Window and go to the folder where you extracted MKBT. Type:mkbt -x bootsect.bin Z:"Z" represents the flash drive drive Letter. So if your flash drive has another drive letter, then change the "Z" accordingly.Now you can [grin] "should" be able to copy the utils you need to the pen drive.
Method 2 - Try these 2 USB Flash Drive Utilities by HP/Compaq. They work with Most other brands of flash drives as well.hpflash2.zip HP USB Disk Storage Format Tool. Formerly called hpflash1.zipHP Drive Key Boot Utility Version 7.41
Download"I would put a little extra in there." Says a fan who emailed me with no name:)For the downloads section I use nLite to make and create the image file as you can import the service packs and do some tweaking to the install files.1. Install the HP USB Disk Storage Format Tool and run the program.
2. Select the Device and the File system from the drop down menus and click start.
3. Close the above program and install and run the HP Drive Key Boot Utility. Selecting the appropriate drive letter. Click Next.
4.Select the circle on the top that says create New or Replace Existing Configuration. Click Next.
5. Select the circle labeled Hard Drive. Click Next.
6. Select Create New Filesystem. Click Next.
7. Select the circle labeled HP Firmware Flash Package. Click Next.
Click Finish
Method 3 - Third Party LinksBoot off USB by floppy, CD, or NT boot menu when your computer doesn't support it
"I use it to boot off of USB by floppy when the computer doesn't support it - although in this mode it cannot save changes made to the setup." said Josh.
Method 4 - A Bootdisk.Com Visitor SuggestedHere is my another method for creating dos bootable USB sticks using windows format.1. From Win98 DOS-Prompt type "SYS {USBDriveLetter}:" or "FORMAT {USBDriveLetter} /U /S". If from WinXp then from start->run command.com execute format.exe copied from win95 or win98.OR2. Simply by enabling copy system files in windows explorer format window. By default it is disabled for non-floppy drives. To enable it use windows enabler program from http://www.angelfire.com/falcon/speedload/Enabler.htm an whoila it works.
Method 5 - Another Bootdisk.Com Fan Suggested - Thanks KeithFirst if you don't have a physical floppy drive (and don't want one) you can use the [free] "virtual floppy driver" from here:With that you get an A: drive and can manipulate a floppy image as if you were using real floppy. You can then use that image to make a bootable CD. It's not that user friendly but once you get how it works it does work perfectly.Even cooler you can use a "raw write" utility like dd for windows to write the floppy image directly to your USB thumb drive. Even without that famous HP utility to do the magic this will make your USB thumb drive bootable. The 'dd' ported to Windows is located here:Another trick you can use with that dd utility involves MS VritualPC (which is free). You can create a virtual machine/virtual hard drive, set it up the way you want then use dd to "raw write" the virtual hard drive image to the thumb drive; this will make the thumb drive identical to the image, including bootable (again, no HP utilities required).Of course, your thumb drive will effectively have the capacity the size if the image in question (your 1GB flash drive will effectively be 1.44 Megs).
Method 6 - Don Wrote below, or see this link from Justin:
http://kmwoley.com/blog/?p=345bootable USB guide, here we assume that you are using either Vista or Windows 7 to create a bootable USB.1. Insert your USB (4GB+ preferable) stick to the system and backup all the data from the USB as we are going to format the USB to make it as bootable.2. Open elevated Command Prompt. To do this, type in CMD in Start menu search field and hit Ctrl + Shift + Enter. Alternatively, navigate to Start > All programs >Accessories > right click on Command Prompt and select run as administrator.3. When the Command Prompt opens, enter the following command:DISKPART and hit enter.LIST DISK and hit enter.Once you enter the LIST DISK command, it will show the disk number of your USB drive. In the below image my USB drive disk no is Disk 1.4. In this step you need to enter all the below commands one by one and hit enter. As these commands are self explanatory, you can easily guess what these commands do.SELECT DISK 1 (Replace DISK 1 with your disk number)CLEANCREATE PARTITION PRIMARYSELECT PARTITION 1ACTIVEFORMAT FS=NTFS(Format process may take few seconds)
ASSIGNEXITDon’t close the command prompt as we need to execute one more command at the next step. Just minimize it.5. Insert your Windows DVD in the optical drive and note down the drive letter of the optical drive and USB media. Here I use “D” as my optical (DVD) drive letter and “G” as my USB drive letter.6. Go back to command prompt and execute the following commands:6.1. Change directory to the DVD’s boot directory where bootsect lives:
d:
cd d:\boot6.2. Use bootsect to set the USB as a bootable NTFS drive prepared for a Vista/7 image. I’m assuming that your USB flash drive has been labeled disk G:\ by the computer:
bootsect /nt60 g:(Where “G” is your USB drive letter)7. Copy Windows DVD contents to USB.You are done with your bootable USB. You can now use this bootable USB as bootable DVD on any computer that comes with USB boot feature (most of the current motherboards support this feature).Note that this bootable USB guide will not work if you are trying to make a bootable USB on XP computer.
Method 7 - Suggested by marc: Boot-USB-StickWhile trying to flash my bios I looked at your page. Most methods are complicated, after a while of browsing the net I found above:
Method 8 - Suggested by Kevin Ying: UNetbootin
Method 9 - Suggested by Shep................: WinToFlash
Method 10 - Suggested by Barney: WiNToBootic
BareBones Boot Floppy And ISO
No comments:
Post a Comment